You know all those awesome recipes and cute DIYs you see on Pinterest? This is my attempt to recreate the ones that catch my eye. I love to craft & cook but I'm not great at coming up with these ideas on my own.
This blog documents my trial & errors at trying out others' ideas, as well as a few of my own.
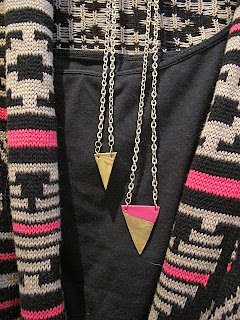
I think it's about time I posted some crafts! I've had these sitting on my Pinterest board for awhile now, and just got around to doing them (like so many of my pins).
First up, these adorable necklaces from Creative Index. I mean honestly, how cute are these?
I try not to be too ambitious about some of the craft ideas I find, because sometimes 99% of the time they look so easy to make but then I end up balling up whatever it was in frustration and chucking it away. But these looked quite doable and would match a sweater I have perfectly, so I decided to give it a go. I got most of the supplies at Hobby Lobby during a trip to Buffalo - why isn't it in Canada yet?! - for a pretty decent price. For the various jewelry-making accoutrements (don't you just love that word?), I went to Arton Beads on Queen St. - seriously, if you're into jewelry making and are ever in Toronto, check this place out. It's easy on the wallet and has a great selection. But I digress. These were actually sort-of easy to make. The clay is pretty hard when you take it out of the package, but once you roll it around in your hands for a bit, it becomes pretty pliable and you can flatten it out. I used a can, because there's some debate on whether polymer clay might be a wee bit toxic, so I didn't want to use any kitchen utensils I use for food prep. Then I cut out a triangle shape with an X-acto knife and kind of mushed the colours together (Creative Index explains it much better than I do, I promise). Don't forget to poke holes in them to attach the jump rings. Then a good 30 minutes or so in the oven (instructions on the clay package) and they're done! My first batch came out a bit derpy, but I'm nothing if not a perfectionist so I used a triangle template the second time and they came out with much cleaner and straighter lines. I'm quite pleased with how these came out!
I know this seems super uncreative, making these in the exact same colour, but I swear they are the best option I've found for matching with this sweater. I haven't found anything better. See?
Onto the second project. Right now I'm living back with my mom, but I'll be moving out again in the fall and I'll admit I'm already looking into projects and decor tips for my own place. I'm past the crummy college years of dealing with ugly paint colours and throwing up posters on the wall - I actually want a cute space to live in now. One of the things I want is a kitchen herb garden. Especially for cilantro & parsley - whenever I buy them for a recipe, I never end up using the entire bunch and it almost always has to go into the compost, and I end up feeling terribly wasteful. So I've decided to plant my own herbs to hopefully stop wasting so much. Does anyone have one? Do you love it?
So anyway, there are all sorts of cute markers for herbs, but I fell in love with these over at Wit & Whistle.
These were even easier to make than the necklaces, because they are not two-toned. You pretty much roll them out with your hands (if you ever played with clay as a kid and made worms, it's pretty much the same idea), shape them with a rolling tool (again, I used a can), stamp them, and bake them. I only made 4 because I don't even have said kitchen herb garden yet and didn't want to be overly ambitious. But, just so you could get an idea, I stuck them in one of our planters. I underestimated how destructive the leaves were and as I was trying to set up the photo, they knocked over and broke a glass candle and dumped my glass of water all over the floor. But aren't they cute?
Ignore the gnome. My mom like gnomes, okay? Let's not make a big deal out of it.
I know this is a long post. I'm wrapping it up, I promise. I just want to show you the awesome dinner I made last night. Chia soy glazed salmon with a heaping "side" of creamy avocado pasta. It was amazing.
I thought it was going to be a massive fail because I set fire to the ends of the pasta (it's a long story, let's not get into it), burned myself twice, and set off the smoke detector twice. But, somehow it turned out okay. The avocado makes the pasta so creamy without actually needing any cream. It's kind of like a guacamole pasta and I'm okay with that.
Verdicts: Successes. Although dinner was looking pretty iffy for awhile there.
In the past, my mom, dad, & brother have usually been the ones to contribute to Christmas dinner. Well, not this year, folks. In my quest to learn to cook more and healthier*, I decided to contribute my breads - I made the olive & rosemary again, as well as the lemon cranberry almond one (recipe over at Simply So Good) - and what very well may be God's beverage, mulled wine. Seriously guys, mulled wine is amazing. In university I took a semester abroad in Poland, and it was like THE go-to drink at all those delightful Eastern European Christmas markets that I remember so fondly and at which I wasted spent way too much money.
*Mulled wine is not that healthy. There was A LOT of sugar that went into this. My dad is a health nut and my brother and I decided to keep the sugar content between ourselves.
There were only about a million recipes online, but I decided to go with this one over at Kitchen Confidante. It did not disappoint.
Sorry for picture quality, this was taken with my iPhone.
It suggests using a Pinot Noir or Cabernet, but knowing nothing about wine, I went to the local LCBO to ask what would be a good choice for mulled wine. People there didn't really know what mulled wine was. I felt kind of dumb but then I just pitied them because I would be enjoying this awesome beverage on Christmas and they would not. I ended up going with this bad boy:
My family loved it. Even my mom, who has a lot of stomach problems and usually avoids wine, had it and said the troubles she suffered were totally worth it.
VERDICT: Success. Except that my dad's wooden spoon will be forever stained.
I meant to post this around Christmastime, but I couldn't for the life of me find my camera cord. I was on the verge of buying a new one when it turned up in my sock drawer a few days ago. To my friends, this sort of tomfoolery will come as no surprise.
So I got this awesome recipe over at Simply So Good for crusty bread that is actually the easiest recipe ever. Flour, yeast, salt, water, DONE. It was awesome. The only part that sucked was the 12-18 hours you have to wait for it to rise. I just did it overnight and when I woke up, BAM, I was ready to roll (hey-o, unintentional pun). My first time making bread and it turned out so well (granted, it's kind of hard to mess up with such easy ingredients). So after my first run, I decided to try it again with some additional ingredients: olives & rosemary. I had no idea how this was going to turn out, but I love olive bread and decided to give it a try. Cut up some fresh rosemary, chop up some black olives (I LOVE that olive bars at the grocery are a thing now) and that was it.
After waiting the obligatory day for it to rise, I poured it out and rolled it up into a ball. I think I over-rolled it because it lost its shape and got really, really sticky even though I really floured that puppy up. Looks like I might have my first mishap.
One of these things does not look like the other.
But, this story has a happy ending. I took it out of the oven and LOOK AT THIS:
This beautiful little orb of dough looks so good...and you guys, yum. This stuff is the bomb diggety. The true test will be to see if it lasts until tomorrow. (Note: it did not).
VERDICT: Success